Uploading data to ADLS Gen2 and accessing via Azure Data Bricks
Azure Data Lake Gen2 (ADLS) is a highly scalable, industry-grade secured, unlimited file storage system that works with the Apache Hadoop ecosystem. What this means is that we can analyse data stored in ADLS using Hadoop frameworks like MapReduce and Hive.
ADLS Gen2 is an updated version of Data Lake taking into consideration the best of the two worlds of Blob Storage and ADLS Gen1 as follows:
1. Data Lake
It retains the properties of Hadoop compatible access.
A superset of POSIX permissions
Optimized Driver
2. Blob Storage
Low cost
Storage Tiers (Hot, Cold, Archive)
High availability and disaster recovery
One of the great features of ADLS Gen2 is that we can now store data in the form of a true file structure. Previously it was not possible to store files within a folder based file structure and thus to reach a file we would have to iterate over all the files. It aids the user by providing a structure within Data Lake that is similar to a computer file structure.

Another added benefit is the inclusion of Access Control List (ACL) that enables the user to manage permissions of read, write and execute on entire folders or even on files at a granular level.
More detailed information about ADLS Gen2 is available https://www.dremio.com/data-lake/azure/
Storing data in ADLS Gen2 from the local machine
In order to upload data from our local machine to ADLS we will first need to create a Storage Account within Azure.
In order to do open up the Azure Dashboard.
Then select Create a Resource → Storage Account → Create


Go ahead and select the subscription and the other necessary fields according to your needs. In order to enable ADLS Gen2 we will need to check the Enable Hierarchical Namespace option in Advanced settings on the storage account creation page.

Once the storage account has been created we can download the Microsoft Azure Storage Explorer SDK and connect it to the Azure account. We will now need to create a container for us to store our file system.

Once we have the container we can then create/upload Folders or files as per our wish using the Storage Explorer SDK
Configuring connection security necessities
Azure Active Directory: We can connect to ADLS from Azure DataBricks in a number of ways. In this tutorial, I will be showing the one using Azure Active Directory and Key Vault. This is the most secure and recommended way of doing it as in this case we will not have to expose our key directly into the script in plain text.
Note: This can only be done if you are using the Premium version of DataBricks. It is not available on the Standard one.
Navigate to Azure Active Directory and create a new App Registration.
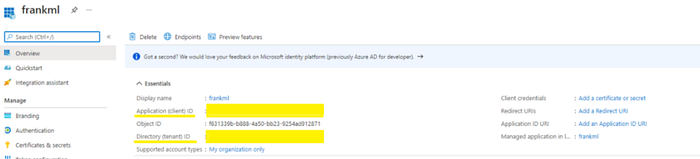
Keep a note of the Client ID and the Tenant ID as we will be requiring this during the connection process from Databricks.
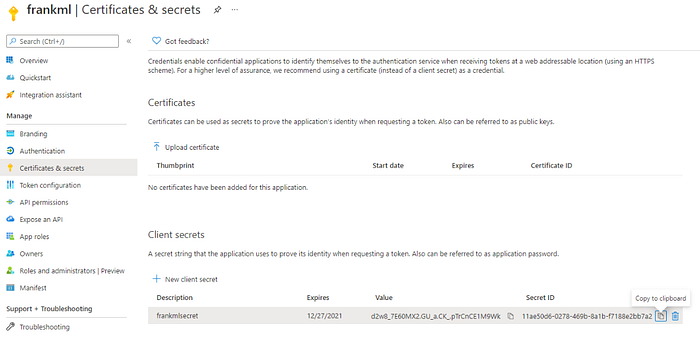
Navigate to Certificates and Secrets and create a new Client Secret. Note down the secret value.
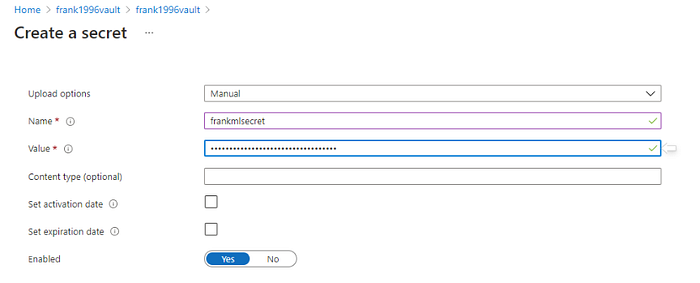
Key Vault: Create a new Key Vault resource. Inside Key Vault go ahead and generate a new Secret.

On the Secret generation page, provide the value copied from Azure Client Secret.
Now we can use this secret key and connect to ADLS from Azure DataBricks instead of having to expose our actual key value in plain text within the script.
Connecting to ADLS from Azure Data Bricks
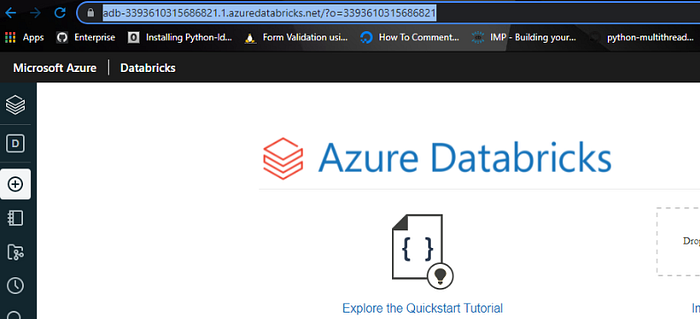
Navigate to create resource on the Azure Dashboard and create a new Azure DataBrick resource. Remember to select Pricing Tier as Premium instead of Standard to ensure that we can connect via Active Directory.
Launch Azure DataBrick resource once it is created and copy the URL.
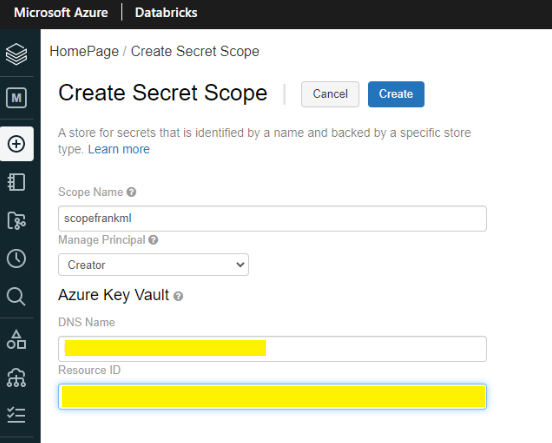
Create a new Scope: Paste it in a New Browser Window and append #secrets/createScope to the URL. This will navigate us to the Scope Creation page inside DataBricks. Copy the DNS Name and Resource ID from Key Vault →Properties in order to create the scope.
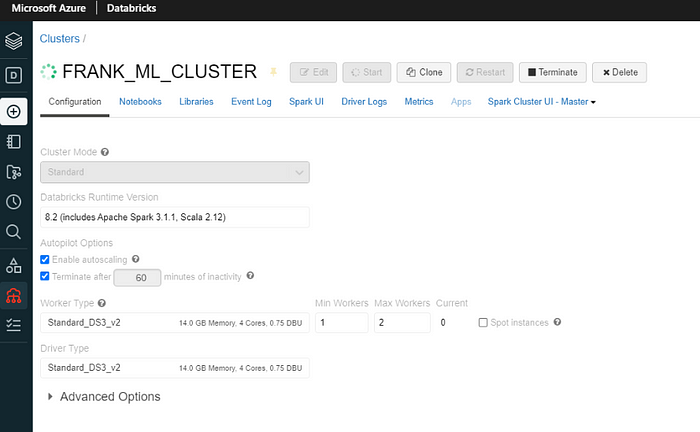
Cluster: Create a cluster to run your DataBricks notebook as per compute requirements.
Create a workspace and a notebook. Connect it to the up and running cluster that we just created from the dropdown.

We are now ready to connect to ADLS from DataBricks.
Connecting and Exploring
We can run the following code in NoteBook to authenticate and create a Mount Point using Python
configs = {"fs.azure.account.auth.type": "OAuth",
          "fs.azure.account.oauth.provider.type": "org.apache.hadoop.fs.azurebfs.oauth2.ClientCredsTokenProvider",
          "fs.azure.account.oauth2.client.id": "<application-id>",
          "fs.azure.account.oauth2.client.secret": dbutils.secrets.get(scope="<scope-name>",key="<service-credential-key-name>"),
          "fs.azure.account.oauth2.client.endpoint": "https://login.microsoftonline.com/<directory-id>/oauth2/token"}

# Optionally, you can add <directory-name> to the source URI of your mount point.
dbutils.fs.mount(
  source = "abfss://<container-name>@<storage-account-name>.dfs.core.windows.net/",
  mount_point = "/mnt/<mount-name>",
  extra_configs = configs)
All we need to do here is replace the Client ID, Scope Name, Key Secret Name, Tenant ID and in the Mount Source specify the container name and storage account name. If we want to navigate to a particular folder inside ADLS directly we can add the path in the mount_point accordingly. After all the details have been populated hit execute the cell to have a connection successfully created to your ADLS Gen2 storage.
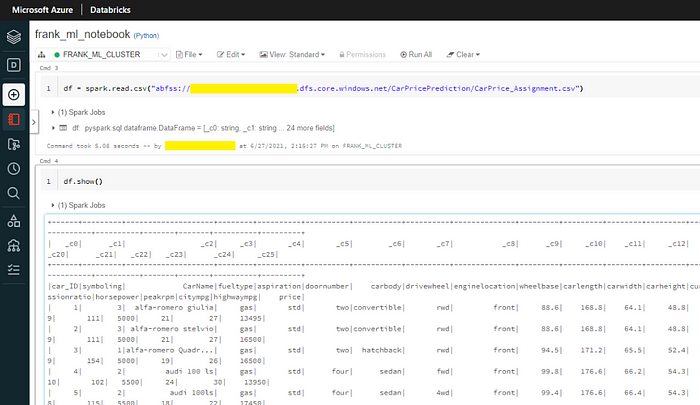
Load the data into a DataFrame and use show() to check the ADLS connection.
And there you have it!
Hopefully, this article helped you figure out how to load data from local to ADLS Gen2 and then access it from Azure DataBricks.